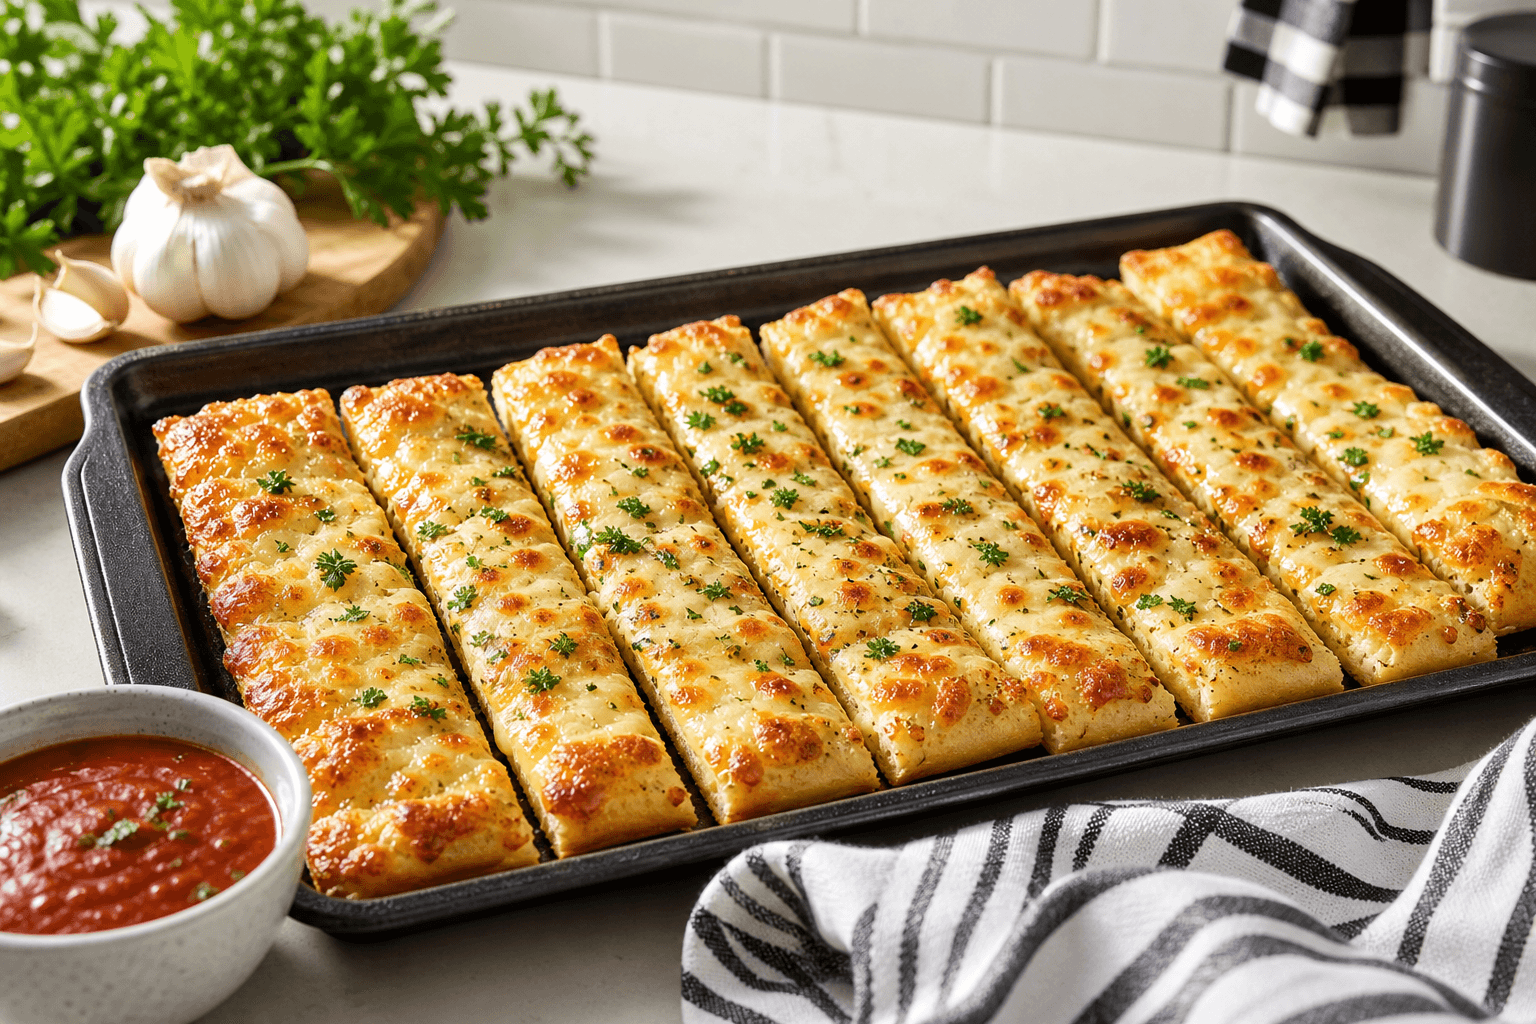
Garlic fingers are thin pizza-style dough brushed with garlic butter, covered with melted cheese and cut into strips for serving. For a dependable home version, use a roughly 30 to 32 cm base about 3 mm thick, bake it at 200°C until the underside is lightly browned and the cheese is fully melted, then cut it into fingers.
This troubleshooting-led recipe helps you get the texture right when dough is sticky, the centre stays soft, the topping turns greasy or the underside remains pale. You will also find exact measurements, shaping options, visual doneness cues, storage guidance and practical fixes for common home-baking problems.
What Are Garlic Fingers?
Garlic fingers are a pizza-bread dish made from thin dough, garlic butter and cheese. They are usually cut into narrow strips after baking, and bacon is a common optional topping. The dish is associated with Atlantic Canadian and Canadian Maritime pizza traditions, where it is also known as garlic cheese fingers.
The difference from ordinary garlic bread is the base. Garlic bread is often made from a sliced loaf or baguette, while garlic fingers use pizza-style dough rolled into a thin round or rectangle. They are also different from cheesy breadsticks because the finished base is typically broad and pizza-like before it is cut into strips. Unlike a regular pizza, garlic fingers usually centre on garlic butter and cheese instead of tomato sauce and a full selection of toppings. Garlic fingers are commonly described as pizza-shaped dough topped with garlic butter, cheese and sometimes bacon.
The Recipe at a Glance
- Yield: 8 to 12 fingers, depending on strip width
- Prep time: 20 minutes
- Rise time: 45 to 60 minutes
- Bake time: 7 to 11 minutes
- Total time: About 1 hour 20 minutes
- Difficulty: Beginner
- Oven: 200°C
- Target base: 30 to 32 cm round or a thin rectangle, about 3 mm thick
Ingredients
For the dough:
- 250 g all-purpose flour, plus extra for the work surface
- 170 ml warm water
- 1 teaspoon active dry yeast
- 1 teaspoon sugar
- 3/4 teaspoon fine salt
- 1 tablespoon neutral oil or olive oil
For the garlic topping:
- 45 g unsalted butter, softened or melted
- 2 large garlic cloves, finely grated or minced
- 1/2 teaspoon dried parsley or 1 tablespoon finely chopped fresh parsley
- 150 g shredded low-moisture mozzarella
- 25 g finely grated Parmesan, optional
- 2 tablespoons finely diced bacon, optional
You will also need a mixing bowl, rolling pin, baking sheet or pizza pan, baking paper if your pan tends to stick, and a sharp knife or pizza cutter.
Ingredients and Practical Substitutions
All-purpose flour gives this dough enough strength to stretch thin without making the base tough. Low-moisture mozzarella melts evenly and releases less water than fresh mozzarella, which helps protect the crisp underside. A small amount of Parmesan adds savoury flavour, but the recipe works with mozzarella alone.
- Store-bought dough: Use about 250 to 300 g of plain pizza dough. Let it sit at room temperature for 30 to 45 minutes before rolling.
- Instant yeast: Mix it directly with the flour instead of dissolving it first. The rise may be slightly quicker, so judge the dough by its volume and feel.
- Fresh garlic: Gives the strongest flavour. Use 1/2 teaspoon garlic powder if necessary, mixing it thoroughly into the butter.
- Butter alternatives: Use olive oil for a lighter, less rich topping. The edges will brown differently and the flavour will be more savoury.
- Cheese: A mozzarella and mild cheddar blend works well. Avoid using only a very wet cheese, since excess moisture can soften the base.
- Toppings: Add bacon, parsley, dried oregano, chilli flakes or a small amount of finely chopped pepper. Keep toppings light so the thin dough cooks through.
For a dairy-free version, use a dairy-free butter alternative and a dairy-free shredded cheese that melts well. The texture depends on the specific cheese, so use a thin layer and watch the base closely as it bakes.
Make the Dough From Scratch
- Activate the yeast. Stir the warm water, sugar and yeast together in a bowl. Leave it for 5 to 10 minutes. A light layer of foam shows that the yeast is active.
- Mix the dough. Add the flour, salt and oil. Stir until no dry flour remains and the mixture forms a rough dough.
- Knead until smooth. Knead on a lightly floured surface for 6 to 8 minutes, or use a dough hook for about 5 minutes. The finished dough should feel soft and slightly tacky, not wet.
- Proof the dough. Place it in a lightly oiled bowl, cover it and leave it in a warm, draft-free place for 45 to 60 minutes. It should look noticeably puffed and close to double in size.
If the dough is sticky after a few minutes of kneading, rest it for 5 minutes before adding flour. If it remains wet, knead in flour one teaspoon at a time. If it feels stiff or cracks when pressed, add water one teaspoon at a time.
The dough is ready when a fingertip pressed gently into it leaves an indentation that slowly springs back. If it collapses immediately, it needs more time. If it has risen far beyond double and feels fragile, shape it promptly so it does not overproof. Related reading: 8 Fries Seasoning Ideas for Crispy, Flavourful Bites.
Shape, Top and Bake the Garlic Fingers

Choose the shape that fits your pan
| Shape | Target size | Best use |
|---|---|---|
| Round | 30 to 32 cm across | Pizza pan, stone or familiar pizza-style presentation |
| Rectangle | About 25 by 35 cm, rolled thin | Sheet pan and easy, even strips |
| Small individual pieces | 10 to 12 cm each | Separate snacks, though they brown faster |
A rectangle is easiest if you want uniform fingers. A round base is equally suitable, but the outer strips will be shorter. Do not press the dough thicker than about 3 mm, since a thick centre can stay soft while the cheese is already browned.
Top and bake
- Heat the oven to 200°C. Put a pizza stone or heavy baking sheet inside while it preheats if you have one.
- Turn the risen dough onto a lightly floured surface and press out the larger air pockets. Roll it to the chosen shape and thickness.
- Transfer the dough to baking paper or a lightly oiled pan. If it resists stretching, let it rest for 5 minutes and try again.
- Mix the butter, garlic and parsley. Brush it over the dough, leaving a narrow uncovered edge. Use enough to coat the surface, but do not allow butter to pool.
- Scatter the mozzarella evenly from edge to edge. Add Parmesan, bacon or other optional toppings sparingly.
- Bake for 7 to 11 minutes, rotating the pan once if your oven browns unevenly.
Start checking at 7 minutes because a thin base can finish quickly. The garlic fingers are done when the cheese is fully melted, the edge is lightly golden, and the underside has light brown spots rather than a pale, doughy appearance. The centre should lift cleanly from the pan and feel set when pressed lightly near an uncovered edge.
A pizza stone or preheated heavy tray usually gives the firmest underside. A cool, thin baking sheet may need an extra 2 to 4 minutes. If the top browns before the base is cooked, move the pan to a lower rack and reduce the cheese layer slightly next time.
Serve Them as Fingers, Slices or a Shared Side

Let the baked base rest for 2 to 3 minutes so the cheese settles, then cut it into strips about 2.5 to 4 cm wide. Cut across the rectangle for classic fingers, or slice a round base into narrow wedges and divide each wedge once more for smaller portions.
Donair-style sauce is a traditional pairing for Canadian garlic fingers, while creamy garlic sauce, ranch or marinara also work well. Canadian descriptions of garlic fingers commonly mention donair sauce as the dipping accompaniment. Serve the sauce on the side so the crust stays crisp until each piece is dipped.
For make-ahead preparation, mix and proof the dough, then refrigerate it in a covered container for up to 24 hours. Bring it out for 30 to 45 minutes before rolling. You can also assemble the unbaked base with garlic butter and cheese, refrigerate it briefly, and bake it while cold with a few extra minutes added to the cooking time.
Refrigerate baked leftovers in a sealed container for up to 3 days. Reheat them on a baking sheet at 190°C for 5 to 8 minutes. For longer storage, freeze cooled fingers in a single layer, transfer them to a freezer bag, and reheat from frozen at 190°C until hot and crisp, usually 10 to 15 minutes.
If you are in Woodstock and would rather compare the homemade result with a prepared option, Noni’s menu lists Garlic Fingers, Cheese Garlic Fingers and Bacon Cheese Garlic Fingers. Compare the cheese garlic fingers options alongside the other pizza sides.
Fix the Problems That Change the Texture
| Problem | Likely cause | Practical fix |
|---|---|---|
| Sticky dough | Too much water or insufficient kneading | Rest it for 5 minutes, then knead in flour a teaspoon at a time. |
| Dry, cracking dough | Too much flour or not enough water | Add water gradually and knead until the dough becomes flexible. |
| Weak rise | Inactive yeast or a cold room | Give the dough more time in a warm place. If there is still no puffing, start again with fresh yeast. |
| Overproofed dough | Too much rising time | Press out excess gas, reshape it and use it promptly. The crust may be less airy. |
| Soggy centre | Thick dough, wet cheese or excess butter | Roll thinner, use low-moisture cheese, prevent butter pooling and bake on a preheated surface. |
| Greasy topping | Too much butter, cheese or bacon | Reduce the topping layer and drain cooked bacon before adding it. |
| Pale underside | Cool pan, low oven heat or an overly thick base | Preheat the pan or stone, bake on a lower rack and check the 3 mm thickness. |
| Burnt garlic | Finely minced garlic exposed on top for too long | Mix it into the butter, spread it thinly and keep the oven near 200°C. |
| Uneven browning | Uneven dough thickness or oven hot spots | Roll from the centre outward and rotate the pan once during baking. |
Choose Homemade or Order Ready-Made
Make this recipe when you want to control the thickness, cheese level and toppings, or when you are planning a snack around the oven. Store-bought dough shortens preparation, while a prepared order is more practical when you need a complete meal without waiting for dough to rise.
For a convenient Woodstock meal, Noni’s Pizza & Wings lists combinations that pair garlic fingers with pizza, wings, dips or drinks. Explore the available garlic fingers combo options when you want a ready-made side alongside a larger order.
Topics & Tags: